Creating and testing accessible PDFs
Accessible PDFs require correct tag order, semantic structure, and alt text set in InDesign. Export settings, compression, and navigation features must be optimized, with final accessibility checks and tab order adjustments completed in Acrobat Pro.

Accessible reading order
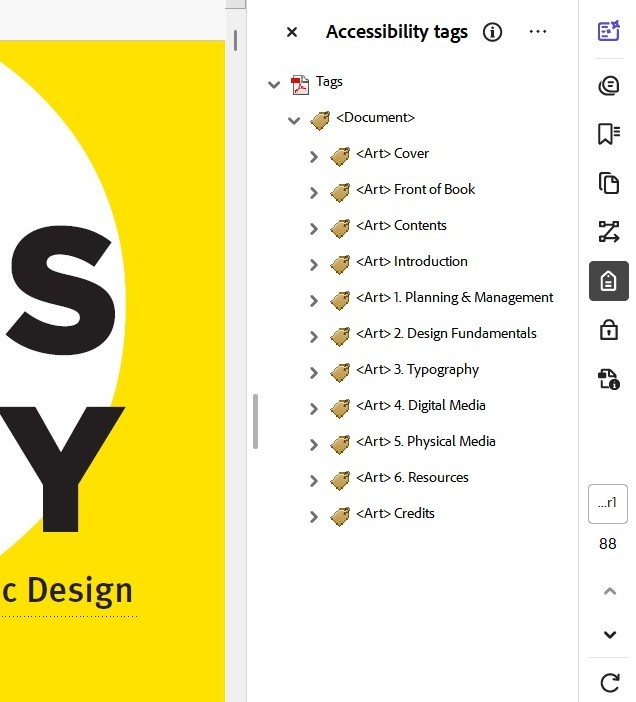
A PDF has both a Tag Order and a Reading Order. The Reading Order reflects the underlying XML structure of the document, but paradoxically it is no longer the dominant technology used to set the reading order for assistive technologies.
When we talk about setting the reading order for a PDF, we are more concerned with the Tag Order which has become the dominant standard for setting the reading order for assistive technology.
Some legacy technologies continue to rely on the underlying XM: structure for the reading order of a PDF. In order to maximize compatibility, the order of this structure should still be considered. The XML structure is set through the Structure panel in InDesign, and testable in the Reading Order panel in Acrobat Pro. However, since the Tag Order is now mandated by ISO PDF standards for setting the reading order, this is the method we review here in detail.
order in Acrobat Pro.
Working in InDesign
The majority of the work needed to ensure a PDF is accessible can be accomplished within InDesign itself. Please note, you will need to be using InDesign CS6 or later.
Tagging
Similar to an HTML page, the semantic structure of PDF needs to be outlined and tagged for screen readers.
Artifacts
In PDFs, Artifacts are page elements that are not part of the content, such as decorative elements, backgrounds, running headers, or page numbers. When these elements are tagged as Artifact, screen readers will know to ignore them. The Artifact tag should also be used to remove any non-semantic character usage from the reading flow.
Running headers or footers
These page elements are recommended in order to help sighted users orient themselves within a document. However, these elements are intrusive for screen reader users, and should be kept out of the reading flow. Tag them as Artifact so that they are skipped by screen readers.
Figures
In PDFs, Figures are visual elements that are not purely decorative, and are meant to convey content, such as an illustrative photo or diagram. These items should be tagged as Figure and have alt text set for them.
Objects
Text objects should be tagged as either Article or Story. The story tag denotes a section within an Article. Non-text objects should be tagged as either Artifact or Figure.
Styles
For designers who already use Paragraph Styles, this process does not add much extra work at all. In the Style Option dialog box, go to the last section called Export Tagging. Under the subheading PDF you can specify the PDF tag from the drop-down menu of P, H, H1, H2, H3, H4, H5, H6, or Artifact.
Lists and tables
For creating semantically tagged lists, use InDesign’s built-in list features. For tables, use InDesign’s built-in table features, and be sure to properly label all columns and rows etc. This is all that is required to ensure that InDesign tags these items correctly upon export.
Additional Information
Beyond simply setting tags, some elements need additional properties to be specified.
- Alt Text. Always specify Alt Text for every item that has been tagged as a Figure. In order to set the alt-text for objects, open the [Object > Object Export Options] panel.
- Hyperlinks. Write descriptive names for each hyperlink that clearly indicate where the link will lead.
- Metadata. The document title must be set in the document metadata. Consider also setting the metadata for the document description and other information that may be useful to the reader.
Designing for reading flow
Text content
The text of your document makes up the backbone of the reading flow. The easiest way to set the flow of text is by simply threading all text frames on a page. Even better, ensure that as much of the document as possible is threaded as a continuous story. Avoid using any extraneous objects or text frames. The closer you can structure your document to this ideal state, the easier it will be to correct any flow issues later.
Within the text
Do not use soft returns/forced line breaks for visual aesthetics. Only use them when you want to indicate that a line of text is finished. Otherwise, use discretionary line breaks, non-breaking spaces, the No-Break property, and other non-semantic elements, in order to achieve the same visual effect.
Non-text content
All non-text objects (such as images and diagrams) that are part of the content of the document need to be anchored inline within the text flow. When a screen reader encounters an anchor for a non-text object, it will read the alt-text that has been set for that object. Make sure that the anchor is positioned in the exact spot within the text flow where the alt-text would make the most sense.
Adjusting the reading Flow
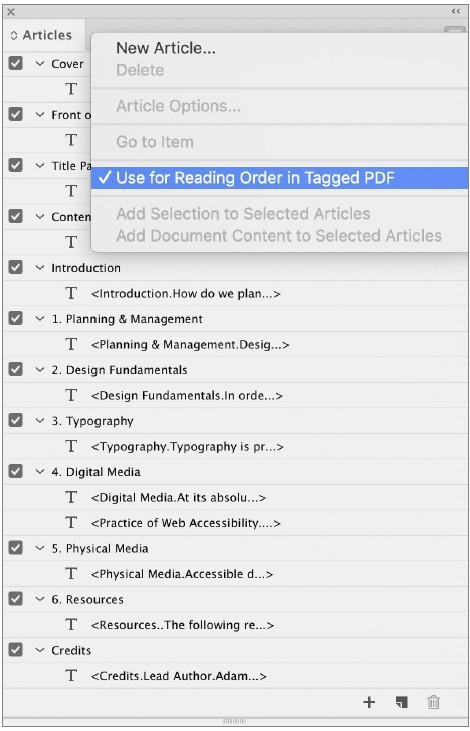
You can adjust the reading order by setting the Tag Order using the Articles panel. On-screen objects can be dragged into the panel, where they can be grouped and arranged into the desired reading order. The visual layout is not affected by changes made in the Articles panels. In the Articles submenu, make sure that Use For Reading Order In Tagged PDF is enabled, in order for the reading order to export properly.
Additional navigation
While internal navigation links are not a mandatory part of an accessible PDF, they canmake an appreciable difference in improving the document’s accessibility. Consider adding bookmarks, cross-references, and a table of contents. These navigational mechanisms can allow a screen reader user to jump around and explore outside of the linear flow of the document. Ensure that any navigational mechanisms also allow the reader to return to their previous place within the content.
Exporting from InDesign
PDF settings
When exporting a PDF from InDesign, ensure the following options are set.
- In the General options, enable Create Tagged PDF.
- In the Advanced options, Display Title should be set to Document Title, and the Language must be set accurately for compatibility with screen readers.
If the export format has been specified as an Adobe PDF (Interactive), the following options will need to be set
- In the General options, ensure that Forms and Media is set to Include All, and enable Use Structure for Tab Order.
If the export format has been specified as an Adobe PDF (Print), the following options will need to be set.
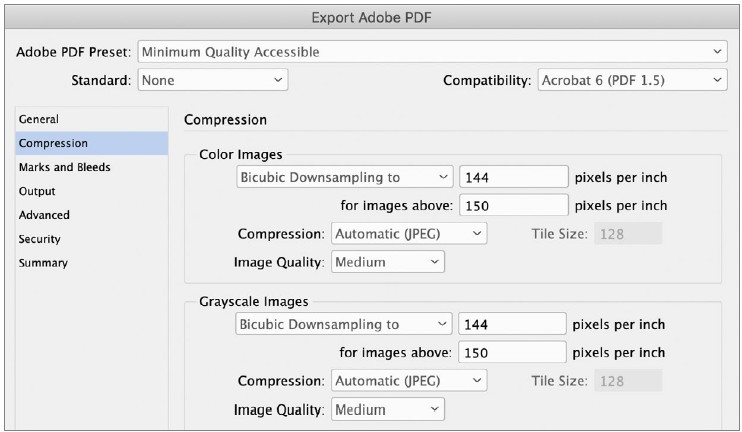
- Set the Compatibility to Acrobat 6 (PDF 1.5)
- In the General options, enable both Bookmarks, and Hyperlinks.
Note that animation, audio, video, interactive buttons, and form fields, will not be exported if Adobe PDF (Print) has been selected.
PDF compression
File size plays a role in the accessibility of a PDF. Not everyone has equal access to computing power and high bandwidth Internet connections. At the same time, a PDF with highly compressed low-resolution imagery is less accessible to those with vision difficulties. Your PDF should display clearly when zoomed in up to 200%.
PDF compression settings
Optimize for file size by resampling images over 150 ppi to 144 ppi, and select the Medium Image Quality setting. This should provide a minimum image quality for accessibility.
Optimize for image quality by resampling images over 300 ppi to 288 ppi, and select either the Medium or High Image Quality setting. Consider providing users the option of both a minimum image quality and a higher image quality version.
Finishing in Acrobat Pro
Set the tab order
If the document was exported as an Adobe PDF (Print), the Tab Order must now be manually set in order for users to be able to navigate the document with a keyboard as expected. With the PDF open in Acrobat Pro, follow these steps.
- Press OK, and Save the document.
- Open the Page Thumbnails and select all the pages in the document.
- With those pages still selected, open the Page Properties dialog box.
- Set the Tab Order to Use Document Structure.
Accessibility check
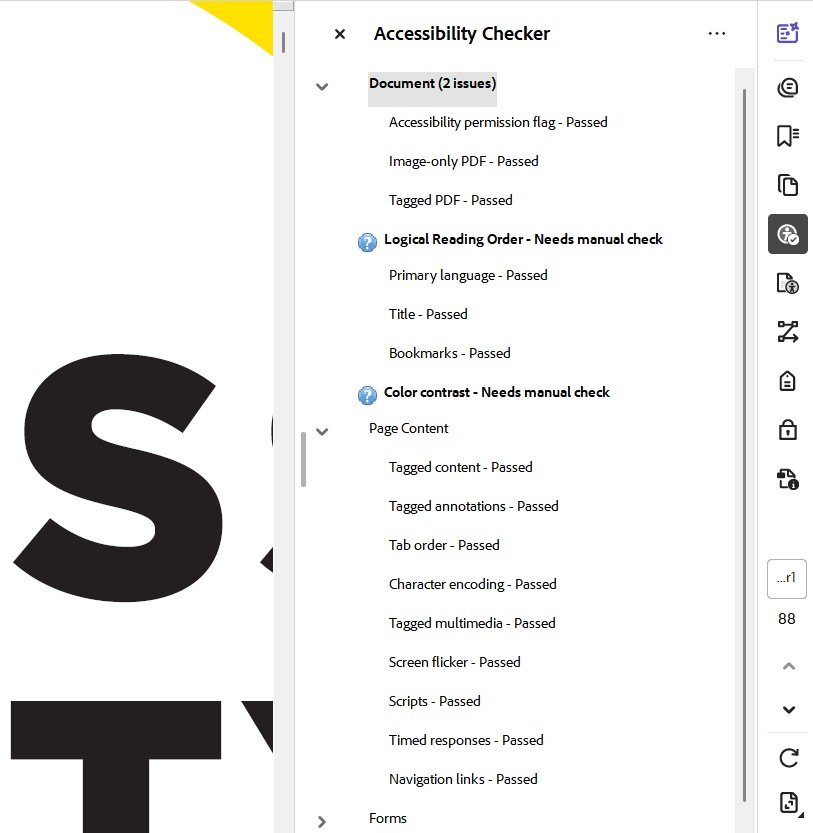
Always perform Acrobat Pro’s automated Full Check for accessibility. Fix any issues it detects. It is important to note that this check cannot verify if a document is effectively accessible or not, but it can detect some common types of accessibility problems. Beyond this check, manual verification is required for the following items.
Interactivity & Form Fields. All interactivity and form fields should be tested.
Tags Panel. Enable the Tags panel to see how the document structure will be interpreted by a screen reader or other assistive technology.
Many problems can be fixed using Acrobat Pro’s Accessibility Tools. However, you might find it more efficient to fix issues in InDesign, and then re-export the PDF to Acrobat Pro for testing.
Keep it clean
Make sure that the PDF contains no extraneous data. PDFs created in InDesign and Acrobat Pro are usually very efficient, but PDFs created in Adobe Illustrator and other software can contain data that needlessly increases the file size by a significant amount. Use Acrobat Pro to clean out any extraneous data, but be sure not to remove any of the information you have added for accessibility.
Check out the video from RGD
Want to go through creating an accessible PDF step by step? In this video from the RGD library, Eric Forest walks us through a real-world workflow from InDesign to Acrobat that supports accessible document creation. Through tagging, reading order and metadata, we explore how to ensure digital documents are usable by all.